
Charging Credit Cards using an iFrame (Payment IFrame)
PCI Compliance is the security implemented for the credit card industry. Use Pay Advantages iFrame to ensure you remain PCI compliant.
This is the world easiest iFrame to implemement and your developers will love you for it. Simply initialise the iFrame and you are notified on a successful payment.
No more... Handling errors, listening for updates and creating a new iframe when thing go wrong.
It handles PayTo, Credit Card, Apple and Google payments all in the single implementation of the iFrame.
Capturing cards using our iframe is the most secure process to capture and store cards thereby limiting your PCI exposure (PCI-DSS is a Payment Card Industry Data Security Standard for managing credit cards so they do not get leaked into the wrong hands). Using the iframe ensures credit card information is captured and stored directly in our secure PCI compliant Card Data Environment.
Pay Advantage hosts a Javascript library which simplifies the consumption of the Pay Advantage Credit Card iframe.
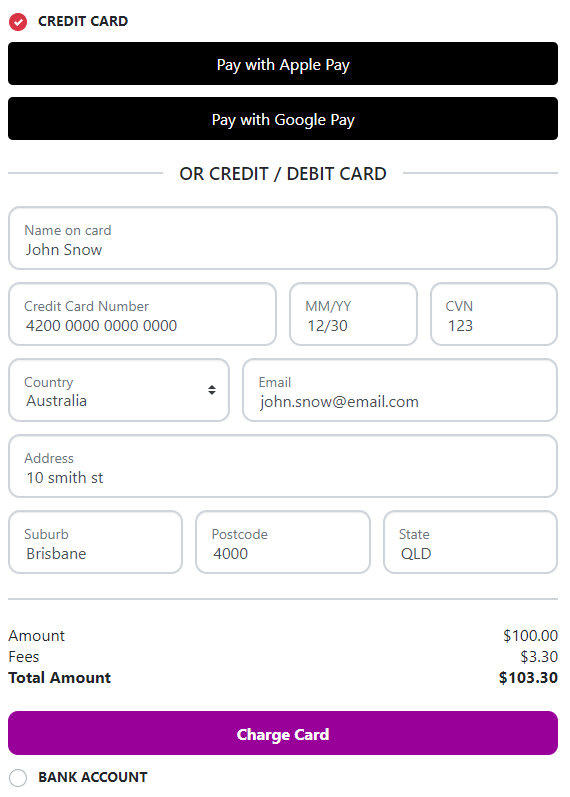
To integrate the iframe into your checkout page follow the below steps:
Step 1: Prepare your page
Add the following resources to your page:
<link rel="stylesheet" text="text/css"
href="https://api.payadvantage.com.au/v3/paymentiframe.css" />
<script src="https://api.payadvantage.com.au/v3/paymentiframe.js" />
Step 2: Create an iframe placeholder on your web application.
The CSS class in the iframe code block below is used by the CSS script resource imported above to control the height and width of the iframe so that it doesn’t show borders or scroll bars.
<iframe id="payment_iframe" src="" allow="payment" >
</iframe>
Step 3: Get a Unique iframe Url
Using the Pay Advantage API, make a call to obtain an iframe Url to be consumed by your page. This Url will contain single-use NONCE token that verifies you have given permission for this iframe to be used on your account.
This step must be completed by your backend server. You will need to create an API call from your front end to the back end to return the iframe URL. This is because the URL /payment_iframes endpoint requires your Pay Advantage bearer token which should always be kept safe in your backend. It is not safe to handle this API request directly using the browser.
This creates a URL that initialises the Credit Card Capture IFrame for use. This URL is short lived and should be used to initialise the PayAdvantagePaymentIFrame once it is available.
Make the IFrameUrl property of the response available to your page.
API CALL POST: v3/payment_iframes
| Type | Required | Parameter Name | Description |
|---|---|---|---|
Object |
Y |
Customer |
The customer code who owns the credit card. |
Number |
Y |
Amount |
The amount of the payment. Set this to 0.00 to tokenise a card without charging it. |
String |
Y |
Description |
The description of the payment. When the amount is 0.00, this field is ignored |
Boolean |
N |
OnchargeFees |
The desired intent of the payment and if the fee amount should be on charged. Default is: false |
String |
N |
ExternalID |
Your identifier for the payment. |
Object |
N |
CustomerPaymentAccount |
The customer payment to use for a pre-filled card purchase. Object contains Code and CanChange. CanChange indicates if the customer is able to process a different card, Code is the CustomerPaymentAccount code. |
Array |
N |
PaymentOptions |
A list of the payment options that the customer is allowed to use.
|
Example with no pre-filled card:
POST: <https://api.payadvantage.com.au/v3/payment_iframes>
{
 	"Customer:{
 		"Code":"ABC123"
 	},
 	"Amount": 9000.00,
 	"OnChargeFees: true,
 	"Description": "Joining fee",
 	"ExternalID": "7871882773"
}
Response

Content-Type: application/json
{
  "IFrameUrl":".../?nonce=XXXX&nonce_type=payment_iframe"
}
Example with pre-tokenized card:
POST: <https://api.payadvantage.com.au/v3/payment_iframes>
{
 	"Customer:{
 		"Code":"ABC123"
 	},
 	"Amount": 9000.00,
 	"OnChargeFees: true,
 	"Description": "Joining fee",
 	"ExternalID": "7871882773",
  "CustomerPaymentAccount":{
  	"Code":"ABC123",
    "CanChange":true
  }
}
Response

Content-Type: application/json
{
  "IFrameUrl":".../?nonce=XXXX&nonce_type=payment_iframe"
}
Step 4: Create an Instance of PayAdvantagePaymentIFrame
On your page, create an instance of PayAdvantagePaymentIFrame for controlling your iframe.
var paymentIFrameElement = document.querySelector('#payment_iframe');
var paymentIFrame = new PayAdvantagePaymentIFrame();
paymentIFrame
  .initialise(paymentIFrameElement, IFrameUrl, options, cardHolderDetails)
  .then(function(result) {
    // Any logic goes here related to the iframe loading.
  })
  .catch(function(error) {
    console.log(error);
  });
Note: Creating an instance of PayAdvantagePaymentIFrame attaches handlers to the window object. You should dispose of the PayAdvantagePaymentIFrame instance when no longer required to release the handlers.
creditCardCapture.dispose();References
initialise
Initialise - Attaches an iframe and registers the iframe message listeners with the window object. Once initialised, the iframe is valid for 30 minutes. After that time, its security will have expired, and it will need to be reloaded.
PayAdvantagePaymentIFrame.initialise(
  iframeElement: HTMLIFrameElement,
  url: string,
  options?: {
    showCard: true,
    showSummary: true,
    colorPrimary: '#FF0000'
  },
  cardHolderDetails?: {
    firstName?: string,
    lastName?: string,
    email?: string,
    address?: {
      addressLine1?: string,
      city?: string,
      country?: string,
      postcode?: string,
      state?: string,
    }
  }
): Promise| Type | Required | Parameter Name | Description |
|---|---|---|---|
| HTMLIFrameElement | Y | iframeElement | The iframe to attach this instance to (Step 4) |
| String | Y | url | The IFrameUrl that was returned by a successful call to <https://api.payadvantage.com.au/v3/payment_iframes> (Step 3) |
| Object | N | options | Options for the iframe. |
| Boolean | N | options.showCard | Shows the credit card image. Defaults to false. |
| Boolean | N | options.showSummary | Shows a summary section of the amount and fees. Defaults to true. |
| Boolean | N | options.colorPrimary | Sets the "primary" colour of the theme. Must be in the format #nnn or #nnnnnn. Defaults to the hosted pages background colour. |
| Object | N | cardHolderDetails | Pre-fills the card holders details when payer authentication is used. All of the values are optional, and the system will prompt the user to complete them when necessary. |
addEventListener
PayAdvantageCreditCardCapture.addEventListener(
  eventName: string,
  listener: EventListenerOrEventListenerObject
): void| Parameter | Description | |
|---|---|---|
eventName |
The name of the event emitted from the iframe after certain actions. The currently supported option are: "complete" – The payment has completed. See the details of the event for the payment authorisation instance of the payment. "resize" – When the iframe changes size due to 3D Secure. "fee-calculated" - If on charge fee is true for the payment, this event will return the calculated fee with the following structure. Use totalAmount to show to the customer so they are aware of the incurred fees. "payment-authorizing" - The payment authorisation is processing. You should monitor this event if you need to disable functionality on your page or application. |
|
listener |
The listener to call when the event is triggered |
removeEventListener
Removes an event listener that was added with addEventListener.
PayAdvantageCreditCardCapture.removeEventListener(
  eventName: string,
  listener: EventListenerOrEventListenerObject
): void| Parameter | Description | |
|---|---|---|
| eventName | The name of the event to stop listening for events. Currently supported options are "complete", "resize", "fee-calculated" and "payment-authorizing" | |
| listener | The listener that was used to reference the call before |
dispose
Cleans up the object and releases all event listeners. This should be called to clean up the iframe set up once it is no longer needed.
PayAdvantageCreditCardCapture.dispose(): voidStep 5: Capturing the Card Details
The capture process will capture the card details and store it as a Customer Payment Account for that customer.
var paymentIFrame = new PayAdvantagePaymentIFrame();
paymentIFrame.addEventListener('complete', (event) => {
  if (event.detail.status === 'success') {
    // Depending on your needs,
    // * update your system to indicate the payment has succeeded
    // * save the credit card code for later use
    // * use it to charge a card using the API
    // Note: For PayTo payments, it is advisable to subscribe to the webhook as the customer may not complete it in realtime.
  } else if (event.detail.status === 'undetermined') {
    // Record that the payment was attempted.
    // You will need to check on this payment until it has either succeeded or failed.
  } else if (event.detail.status === 'failed') {
    // The payment failed to completed. The iframe will remain active allowing the customer to make another attempt.
  }
});
References
complete event
When the complete event is raised, you will received a copy of the payment authorisation.
Example of Payment
{
  // Standard Javascript event properties
  detail: {
    "code": "Y7D7SA",
    "externalID": null,
    "description": "Invoice 123",
    "createdBy": "An Awesome App",
    "dateCaptured": "2022-10-07T08:40:26.027+11:00",
    "dateCreated": "2022-10-07T08:40:25.963+11:00",
    "amountCaptured": 100,
    "amountCapturedIncFees": 100,
    "payment": {
      "dateFailed": null,
      "failReason": null,
      "failCode": null,
      "code": "Z7D7SA"
    },
    "dateFailed": null,
    "failReason": null,
    "failCode": null,
    "cvnCheckResponse": "matched",
    "isProcessing": false,
    "customerPaymentAccount": {
      //store this code to charge this card later using the charge API
      "code": "D7D7SA",
      "dateFailed": null
    },
    "isUndetermined": false
	}
}
Example of Tokenisation
{
  // Standard Javascript event properties
  detail: {
	{
    "code": "UTY7SA",
    "externalID": null,
    "description": "store card",
    "createdBy": "An Awesome App",
    "dateCaptured": null,
    "dateCreated": "2022-10-07T08:58:40.387+11:00",
    "amountCaptured": null,
    "amountCapturedIncFees": null,
    "payment": null,
    "dateFailed": null,
    "failReason": null,
    "failCode": null,
    "cvnCheckResponse": "matched",
    "isProcessing": false,
    "customerPaymentAccount": {
      //store this code to charge this card later using the charge API
      "code": "D7D7SA",
      "dateFailed": null
    },
    "isUndetermined": false
  }
}
You will need to store the customerPaymentAccount.code so that you can charge
the card later using Charge a Stored/Tokenised Card.
Merchant-keyed (MOTO) payments with the Payment IFrame
The Payment IFrame lets you capture and charge a card without handling card data directly — the card details are entered into a secure Pay Advantage-hosted frame, never your own systems. Until now, every card payment through the iframe ran through 3D Secure (PayerAuthentication), which asks the cardholder to complete a verification step with their bank.
That's exactly right when the customer is present and entering their own card. It doesn't work when a merchant keys a customer's card on their behalf — for example a phone or mail order — because there's no cardholder on hand to complete the 3D Secure challenge. In that case the payment either presents an impossible challenge or is rejected for exceeding the no-verification limit.
This update extends the Payment IFrame so a connected (OAuth) application can indicate that a payment is merchant-keyed rather than customer-entered. When it does, the iframe loads the basic (non-3D Secure) card-entry screen and processes the charge as a merchant-keyed (MOTO – mail or telephone order) transaction — the same way the Pay Advantage Virtual Terminal already works.
Availability. Live in sandbox for testing now, and in production from 30 June 2026.
The concept: customer-facing vs merchant-keyed
| Customer-facing | Merchant-keyed | |
|---|---|---|
| Who enters the card? | The cardholder, themselves | The merchant, on the customer's behalf |
| Typical scenario | Online checkout, self-service payment | Phone order, mail order, over-the-counter |
| 3D Secure | Yes — required | No — cardholder isn't present to complete it |
| Pay Advantage equivalent | Hosted checkout | Virtual Terminal |
The Payment IFrame now supports both. You tell it which one you're in with a single field.
The isCustomerFacing field
A new optional field on the Payment IFrame request:
isCustomerFacing — boolean, nullable, default unset.
Indicates whether the cardholder is present and entering their own details.
| Value | Behaviour |
|---|---|
| Omitted (default) or true | Existing behaviour — 3D Secure applies per your trust level, configuration, or an explicit requirePayerAuthentication. |
| false | Merchant-keyed — the iframe loads the basic credit card screen, 3D Secure is not used, and the charge is processed as a merchant-keyed (MOTO) transaction. |
Because it defaults to unset, every existing integration continues to work unchanged. This is a purely additive change — no existing fields have been modified or removed.
How to use it
Add isCustomerFacing: false to your existing POST /v3/payment_iframes request whenever the merchant is keying the card:
POST /v3/payment_iframes

{
  "customer": { "code": "MOAMDO" },
  "amount": 250.00,
  "description": "Order #12345",
  "paymentOptions": ["creditcard"],
  "isCustomerFacing": false        // ← merchant is keying the card on the customer's behalf
}
The returned iframe URL loads the basic card-entry screen with no 3D Secure step. The rest of your integration — loading the iframe, submitting the payment, and the follow-up token exchange — is unchanged.
For a customer who is entering their own card, simply omit the field (or send true), and the iframe behaves exactly as it does today.
Rules and behaviour
Connected (OAuth) applications only. isCustomerFacing: false is honoured for trusted server-side callers — a merchant's own registered application. It is intentionally ignored for the customer-facing hosted checkout, which always runs 3D Secure. This means it can never be used to weaken security on a genuine customer-entered payment.
Cannot be combined with requirePayerAuthentication: true. One asks to skip 3D Secure and the other forces it on, so sending both together returns 400 Bad Request. For a merchant-keyed payment, send isCustomerFacing: false on its own.
Higher-value payments are no longer blocked. Merchant-keyed charges are measured against the same no-verification limit the Virtual Terminal uses, rather than the customer-facing hosted limit that previously rejected them with "Payment amount exceeds limit."
Everything else is unchanged. Apple Pay, Google Pay, PayTo and PayID options on the same endpoint, the existing 3D Secure path, and Virtual Terminal card entry all behave exactly as before.
A note on chargeback liability
A merchant-keyed payment skips 3D Secure, which means the cardholder isn't authenticated by their bank — so the chargeback-liability protection that 3D Secure provides doesn't apply to these transactions. This is the same trade-off that already applies to Virtual Terminal payments, and it's the expected behaviour for card-not-present phone and mail orders.
For that reason, reserve isCustomerFacing: false for genuine merchant-keyed scenarios, and leave customer-entered payments on the default (3D Secure) path.
JSDoc Documentation
For further documentation of the iframe objects, ultilise the JSDoc information provided in the paymentiframe.js file located here: <https://api.payadvantage.com.au/v3/paymentiframe.js>
Updated 4 months ago