
Process Authenticated Payments using Credit Card
To avoid chargebacks, capture the card details and then send a payment request link
Pay Advantage has limits on credit card processing via the API to limit your exposure to fraud and potential chargebacks. Using 3DS technology you are able to capture customers credit card payment acceptance using payment requests or our PCI compliant iFrame.
This solution is also useful for when you are using a 3rd party to pass you the credit card details. This process allows you to store the credit card immediately and then send out a verification link to ensure the customer verification of the payment.
Step 1. Create the customer
Create a customer to be able to add the payment to.
Example Request
{
  "Email":"[email protected]",
  "IsConsumer": true,
  "Firstname": "Michael",
  "Lastname": "Jordan",
  "CountryISO3316": "AU",
  "Street1": "1 Fake St",
  "Postcode": "4000",
  "state": "Brisbane",
  "Mobile": "0222345117",
  "MobileCountryISO3316": "NZ",
  "homePhone": "0222345117",
  "homePhoneCountryISO3316": "NZ",
  "Phone": "0222345117",
  "PhoneCountryISO3316": "US"
}
Example Response
{
    "Code": "DBRU6A",
    "ExternalID": null,
    "IsConsumer": true,
    "Name": "Michael Jordan",
    "FirstName": "Michael",
    "LastName": "Jordan",
    "CustomRef": null,
    "Email": "[email protected]",
    "BillerCode": null,
    "BPAYRef": null,
    "DateUpdated": "2023-11-08T13:57:36.913+11:00",
    "DateCreated": "2023-11-08T13:57:36.913+11:00",
    "DateJoined": "2023-11-08T00:00:00.000+11:00",
    "CreatedBy": {
        "FirstName": "API",
        "LastName": null,
        "UserName": "test_46bad997c9bb4858a71d55f310e271d7"
    },
    "IsActive": true
}
Step 2. Capture the card via the API
Using the /Payment_Authorization endpoint with following settings. Amount must be $0 and performCapture is required to be false. This will store the card in Pay Advantage for usage at a later time.
Example Request
curl --request POST \
     --url https://api.test.payadvantage.com.au/v3/payment_authorizations \
     --header 'accept: application/json' \
     --header 'content-type: application/json' \
     --data '
{
  "creditCard": {
    "cardholder": {
      "address": {
        "addressLine1": "123 Fake St",
        "city": "Brisbane",
        "country": "AU"
      },
      "firstName": "Michael",
      "lastName": "Jordan",
      "email": "[email protected]"
    },
    "cardNumber": "4200000000000000",
    "expiryMonth": 9,
    "expiryYear": 2025
  },
  "customer": {
    "code": "DBRU6A"
  },
  "externalID":"Your External ID",
  "cvn": "000",
  "amount": 0,
  "performCapture": false,
  "onchargeFees": false,
  "description": "New Basketballs"
}
'
The response object will contain the Customer Payment Account code. This can be used to insert into the payment request or iFrame to create a secure card for the customer.
Example Response
{
    "Code": "ZBRU6A",
    "ExternalID": "Your External ID",
    "Description": "New Basketballs",
    "AmountAuthorized": 0.00,
    "AmountAuthorizedIncFees": 0.00,
    "CreatedBy": "API",
    "DateCaptured": null,
    "DateCreated": "2023-11-08T13:58:23.88+11:00",
    "DateExpires": null,
    "AmountCaptured": null,
    "AmountCapturedIncFees": null,
    "Payment": null,
    "DateVoided": null,
    "VoidedBy": null,
    "DateFailed": null,
    "FailReason": null,
    "FailCode": null,
    "CvnCheckResponse": "matched",
    "IsProcessing": false,
    "CustomerPaymentAccount": {
        "Code": "YBRU6A",
        "DateFailed": null
    }
}
Step 3. Request acceptance of the payment total
Now that you've stored the card you can send out a secure link to retrieve the payment from the customer.
Option 1. Send a payment request link
A payment link requires very little coding to set up and will be the fastest way to receiving money from your customers.
Send out a payment request with the payment request API
Example Payment Request
The Customer Payment Account value must be the code returned from the /payment_authorizations endpoint so that it will send the link with a prefilled credit card information.
curl --request POST \
     --url https://api.test.payadvantage.com.au/v3/payment_requests \
     --header 'accept: application/json' \
     --header 'content-type: application/json' \
     --data '
{
  "CustomerPaymentAccount": {
    "Code": "YBRU6A"
  },
  "Customer":{
      "Code": "DBRU6A"
  },
  "Description": "New Basketballs",
  "ExternalID": "Your External ID",
  "Amount": 9000,
  "OnchargeFees": true,
  "PaymentOptions": [
    "credit_card"
  ],
  "ExpiryDays": 7
}
'
Example Response
{
"Code": "8BRU6A",
"DateCreated": "2023-11-08T03:05:25.057+00:00",
"DateClosed": null,
"DateExpires": "2023-11-15T03:05:25.057+00:00",
"Description": "New Basketballs",
"ExternalID": "Your External ID",
"Amount": 9000.00,
"SendReminders": false,
"OnchargeFees": true,
"PaymentOptions": [
"credit_card"
],
"Customer": {
"Code": "DBRU6A"
},
"Links": [
{
"Code": "MXFG6Z",
"Url": "https://dev.payrequest.link:44397/MXFG6Z"
}
],
"Payments": null,
"PaymentAuthorizations": null,
"CustomerPaymentAccount": {
"Code": "YBRU6A"
},
"CardAuthenticationRequest": null
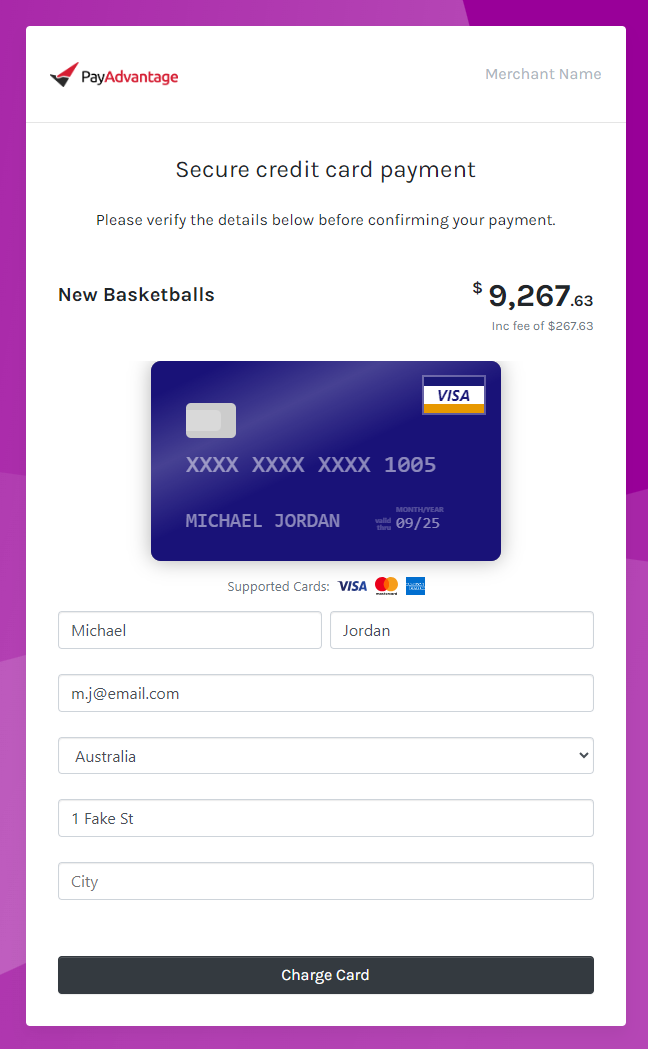
}You can now share this link under the Links > Code section for a prefilled credit card for customers to complete. The customer will be taken to your styled payment request site and asked to click the "Charge Card" button.
See the example below for an example of what the customer will be sent.
If the CustomerPaymentAccount object has the flag CanChange: "true" then the customer will be able to use a different card for the payment. The new card will also complete card authentication for safe transaction management.
Option 2. Implement the iFrame for a customised experience
When you want a customised experience so that you can use your own branding and wording to ensure the customer completes the payment, such as a confirm booking screen you can use the iFrame to provide a customised experience.
Follow the guide here on implementing an iFrame on your website. https://docs.payadvantage.com.au/docs/capture-cards-with-iframe
NOTE: Remember to use the customerPaymentAccount object to ensure you pass in the credit card that was obtained in the beginning when the /payment_authorization endpoint was called.

The iFrame screen shown to user when using a customer payment account.
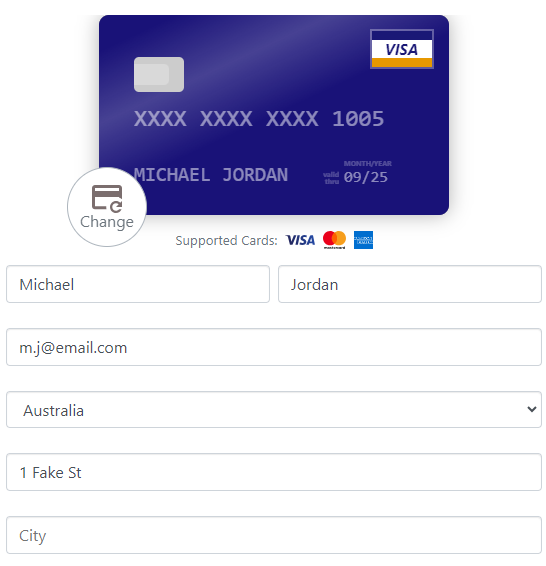
If CanChange is passed as a parameter the customer is able to change the card if it is not the desired card for that payment.
Updated 10 months ago